Ingredients
This recipe is all about simple ingredients coming together to create something extraordinary. Each component plays a vital role in building the layers of flavor and texture that make this cake so irresistible. Here’s what you’ll need to gather to embark on this no-bake dessert adventure:
- Graham Crackers (or Vanilla Wafers): Approximately 2 ½ cups of graham cracker crumbs or crushed vanilla wafers. These form the base of our cake, providing a delicate, slightly sweet foundation that perfectly complements the creamy layers to come. You can use pre-crushed crumbs for convenience or crush them yourself using a food processor or by placing them in a zip-top bag and rolling over them with a rolling pin.
- Unsalted Butter: ½ cup (1 stick), melted. The melted butter acts as a binding agent for the graham cracker crumbs, creating a cohesive and slightly firm crust that holds its shape beautifully. Unsalted butter is preferred to control the salt level in the dessert, allowing the sweetness of the other ingredients to shine through.
- Cream Cheese: 8 ounces, softened to room temperature. This is the heart of the creamy layer, providing a tangy richness that balances the sweetness of the other ingredients. Ensure your cream cheese is truly softened to avoid lumps and ensure a smooth, velvety texture in the final cake. Full-fat cream cheese is recommended for the best flavor and texture.
- Powdered Sugar: 1 ½ cups, sifted. Powdered sugar, also known as confectioners’ sugar, sweetens the cream cheese layer and helps to create a smooth, light, and airy texture. Sifting the powdered sugar is important to remove any lumps, ensuring a silky smooth cream cheese mixture.
- Vanilla Extract: 1 teaspoon. A touch of pure vanilla extract enhances the overall flavor profile, adding a warm, aromatic note that complements both the cream cheese and the fruit. Use pure vanilla extract for the best and most authentic vanilla flavor.
- Heavy Whipping Cream: 1 ½ cups, cold. Cold heavy whipping cream is essential for creating a light and fluffy whipped topping that forms a crucial layer in our cake. Whipping cream adds volume, richness, and a delightful airy texture that contrasts beautifully with the denser layers below.
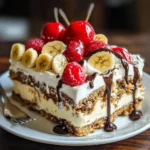
- Bananas: 3-4 medium bananas, sliced. The star of the show! Ripe but firm bananas are best for this recipe. They provide the quintessential banana split flavor and a soft, sweet texture that melds perfectly with the other ingredients. Slice them just before assembling the cake to prevent browning.
- Canned Pineapple Tidbits: 1 (20 ounce) can, drained well. Pineapple adds a tropical tang and juicy sweetness that is characteristic of a banana split. Make sure to drain the pineapple tidbits thoroughly to prevent excess moisture from making the cake soggy.
- Canned Strawberry Pie Filling: 1 (21 ounce) can. Strawberry pie filling provides a vibrant burst of berry flavor and a pleasingly sweet and slightly tart element that complements the banana and pineapple beautifully. You can also use fresh strawberries, macerated with a little sugar, if you prefer a fresher option, though canned pie filling offers convenience and a consistent texture.
- Chocolate Syrup: For drizzling. No banana split is complete without a generous drizzle of chocolate syrup! It adds a rich, decadent chocolatey note that ties all the flavors together and provides a classic banana split element. Use your favorite brand of chocolate syrup.
- Chopped Nuts: Optional, for garnish. Chopped nuts, such as pecans, walnuts, or peanuts, add a delightful crunch and nutty flavor that enhances the overall texture and taste of the cake. They are a classic banana split topping and provide a welcome textural contrast.
- Maraschino Cherries: Optional, for garnish. Maraschino cherries are the quintessential banana split garnish, adding a pop of color, a sweet, slightly tangy flavor, and a touch of nostalgic charm. They complete the classic banana split look and add a final flourish to the dessert.
Instructions
Creating this No-Bake Banana Split Cake is surprisingly simple and requires no baking at all! Just follow these step-by-step instructions, and you’ll be enjoying a delicious and impressive dessert in no time. The key is to take your time with each layer, ensuring it’s evenly spread and properly set before moving on to the next.
Step 1: Prepare the Graham Cracker Crust
- Crush the Graham Crackers: If you are using whole graham crackers, place them in a food processor and pulse until you have fine crumbs. Alternatively, you can place them in a large zip-top bag, seal it tightly, and use a rolling pin to crush them into fine crumbs. Aim for about 2 ½ cups of crumbs. The finer the crumbs, the smoother your crust will be.
- Melt the Butter: In a microwave-safe bowl or in a saucepan over low heat, melt ½ cup (1 stick) of unsalted butter completely. Ensure the butter is fully melted but not boiling hot.
- Combine Crumbs and Butter: In a medium mixing bowl, combine the graham cracker crumbs and the melted butter. Mix thoroughly until all the crumbs are evenly moistened and the mixture resembles damp sand. This step is crucial for creating a crust that holds together well.
- Press into Pan: Press the graham cracker crumb mixture evenly into the bottom of a 9×13 inch baking dish. Use the back of a spoon or your fingers to firmly press the crumbs into a uniform layer, ensuring it’s compact and even across the bottom of the pan. This will form the base of your cake.
- Chill the Crust: Place the baking dish with the crust in the refrigerator or freezer to chill for at least 15-20 minutes. Chilling helps the crust to firm up and set, making it easier to spread the subsequent layers. For a quicker set, the freezer works best.
Step 2: Make the Cream Cheese Layer
- Soften the Cream Cheese: Ensure your 8 ounces of cream cheese is softened to room temperature. This is crucial for achieving a smooth, lump-free cream cheese layer. If it’s still cold, it will be difficult to mix smoothly and may leave lumps in your final layer.
- Beat Cream Cheese and Powdered Sugar: In a large mixing bowl, using an electric mixer (hand mixer or stand mixer), beat the softened cream cheese until it is smooth and creamy. Gradually add the 1 ½ cups of sifted powdered sugar, beating on low speed at first to prevent a powdered sugar cloud, then increasing to medium speed once incorporated. Continue beating until the mixture is light, fluffy, and well combined. Sifting the powdered sugar is important to avoid lumps.
- Add Vanilla Extract: Stir in 1 teaspoon of vanilla extract and mix until just combined. The vanilla enhances the flavor of the cream cheese layer and adds a subtle warmth.
- Spread Cream Cheese Layer: Remove the chilled crust from the refrigerator or freezer. Spread the cream cheese mixture evenly over the graham cracker crust. Use an offset spatula or the back of a spoon to create a smooth and even layer, making sure to reach all corners of the pan.
- Chill Again: Return the baking dish to the refrigerator or freezer and chill for another 15-20 minutes to allow the cream cheese layer to set slightly. This will make it easier to layer the fruit on top.
Step 3: Prepare the Whipped Topping Layer
- Chill Mixing Bowl and Beaters: Place your mixing bowl and mixer beaters in the freezer for about 10-15 minutes before you start whipping the cream. Cold equipment helps the heavy whipping cream whip up to stiff peaks more quickly and easily.
- Whip Heavy Cream: Pour 1 ½ cups of cold heavy whipping cream into the chilled mixing bowl. Using an electric mixer, beat on medium-high speed until stiff peaks form. Start on low speed to prevent splashing, then gradually increase speed. Watch carefully as you whip; you want stiff peaks that hold their shape but don’t over-whip to the point of becoming grainy.
- Gently Spread Whipped Topping: Remove the baking dish from the refrigerator or freezer. Gently spread the whipped topping evenly over the cream cheese layer. Use a light touch to avoid disturbing the cream cheese layer underneath. Create a smooth, even layer of whipped topping.
Step 4: Assemble the Banana Split Toppings
- Slice the Bananas: Just before assembling, slice 3-4 medium bananas into ¼-inch thick slices. Slicing them right before assembling prevents them from browning.
- Arrange Bananas: Arrange the banana slices in a single layer over the whipped topping. You can create rows of banana slices or arrange them randomly, ensuring they cover the surface of the whipped topping as much as possible.
- Sprinkle Pineapple: Evenly sprinkle the well-drained canned pineapple tidbits over the banana slices. Distribute them uniformly across the cake.
- Spoon Strawberry Pie Filling: Spoon the canned strawberry pie filling over the pineapple and bananas. You can spread it out gently or create dollops of filling across the cake, depending on your preference.
Step 5: Final Chilling and Garnishing
- Chill Completely: Cover the baking dish with plastic wrap or foil and refrigerate for at least 2-3 hours, or preferably overnight. This chilling time is crucial for allowing all the layers to set and meld together, creating the perfect texture and flavor. The longer it chills, the better the flavors will combine.
- Drizzle with Chocolate Syrup: Just before serving, drizzle generously with chocolate syrup over the top of the cake. Create a decorative pattern or simply drizzle it randomly for a classic banana split look.
- Garnish (Optional): If desired, garnish with chopped nuts and maraschino cherries. Sprinkle chopped pecans, walnuts, or peanuts over the chocolate syrup and place maraschino cherries strategically around the cake for that final banana split touch.
- Serve and Enjoy: Cut into squares or slices and serve chilled. This No-Bake Banana Split Cake is best enjoyed cold and is a perfect dessert for any occasion!
Nutrition
- Serving Size: one normal portion
- Calories: 450
- Fat: 25g
- Saturated Fat: 15g