
Introduction
Chocolate and peanut butter are two flavors that harmonize beautifully, creating a delectable taste experience that is hard to resist. For those who cherish this classic combination, Chocolate Peanut Butter Bliss Bars offer a heavenly treat. These bars are not just delightful to the taste buds but also relatively simple to make, making them a perfect dessert or snack option for any occasion.
In this article, we’ll explore everything you need to know to make your own Chocolate Peanut Butter Bliss Bars, from the ingredients required to the preparation process. We’ll also delve into the nutritional aspects, serving suggestions, and tips to ensure your bliss bars are perfect every time. So, if you’re a fan of this timeless flavor duo, read on to discover how you can create these mouth-watering treats.
Ingredients
To create Chocolate Peanut Butter Bliss Bars, you’ll need the following ingredients:
- Crust:
- 1 and 1/2 cups of graham cracker crumbs
- 1/2 cup of unsalted butter, melted
- 1/4 cup of granulated sugar
- Peanut Butter Layer:
- 1 cup of creamy peanut butter
- 1/2 cup of unsalted butter, softened
- 1 and 1/2 cups of powdered sugar
- 1 teaspoon of vanilla extract
- Chocolate Layer:
- 1 and 1/2 cups of semi-sweet chocolate chips
- 1/4 cup of creamy peanut butter
- Optional Toppings:
- Chopped peanuts
- Sea salt
- Drizzle of melted white chocolate
Instructions
Creating these bliss bars is a straightforward process. Follow these steps to ensure your bars turn out perfect:
Step 1: Prepare the Crust
- Preheat your oven to 350°F (175°C).
- In a bowl, combine graham cracker crumbs, melted butter, and granulated sugar. Mix until the crumbs are evenly coated.
- Press the mixture firmly into the bottom of a 9×13-inch baking dish.
- Bake the crust for about 8-10 minutes until it’s lightly golden. Remove from the oven and let it cool.
Step 2: Make the Peanut Butter Layer
- In a large mixing bowl, beat the softened butter and creamy peanut butter together until smooth and creamy.
- Gradually add powdered sugar and continue mixing until fully combined.
- Stir in the vanilla extract.
- Spread the peanut butter mixture evenly over the cooled crust.
Step 3: Prepare the Chocolate Layer
- In a microwave-safe bowl, melt the chocolate chips and peanut butter together in 30-second intervals, stirring in between until smooth.
- Pour the chocolate mixture over the peanut butter layer, spreading it evenly.
Step 4: Add Toppings and Chill
- If desired, sprinkle optional toppings such as chopped peanuts, sea salt, or a drizzle of melted white chocolate over the chocolate layer.
- Refrigerate the bars for at least 2 hours or until set.
Step 5: Slice and Serve
- Once set, remove the bars from the refrigerator and let them sit at room temperature for a few minutes for easier slicing.
- Cut into squares and serve.
Nutrition Facts
While Chocolate Peanut Butter Bliss Bars are undoubtedly delicious, it’s important to be mindful of their nutritional content. Here’s a general overview of the nutritional facts per serving (1 bar, assuming 24 bars per batch):
- Calories: Approximately 250
- Total Fat: 16g
- Cholesterol: 20mg
- Sodium: 120mg
- Total Carbohydrates: 23g
- Protein: 4g
Note: These values are approximate and can vary based on specific brands and measurements used.
How to Serve
Chocolate Peanut Butter Bliss Bars are not only delicious but also incredibly versatile, making them suitable for a variety of occasions. Here’s how to enhance your serving experience and make the most out of these delightful treats:
As a Dessert
For those looking to indulge their sweet tooth, serving Chocolate Peanut Butter Bliss Bars as a dessert is a fantastic option. For an extra special touch, plate the bars chilled and accompany them with a generous scoop of velvety vanilla ice cream. The creamy texture of the ice cream perfectly complements the rich, fudgy layers of the bars, creating a harmonious balance of flavors. To elevate the presentation, drizzle some warm chocolate sauce or a sprinkle of crushed peanuts over the top before serving. Garnishing with a sprig of fresh mint can add a pop of color and an aromatic touch that enhances the overall experience.
As a Snack
Chocolate Peanut Butter Bliss Bars make for an ideal snack, particularly during those mid-afternoon slumps when you need a little pick-me-up. Pair them with a steaming cup of freshly brewed coffee or a soothing herbal tea to create a delightful combination. The bars are rich enough to satisfy your cravings while still being easy to enjoy on-the-go. For a more health-conscious approach, consider cutting the bars into smaller, bite-sized pieces to enjoy as a guilt-free treat. Adding a handful of mixed nuts or a piece of fruit alongside can create a balanced snack that provides both energy and nourishment.
For Gatherings
When it comes to social events, Chocolate Peanut Butter Bliss Bars shine as a crowd-pleasing dessert. Present them on a beautifully arranged dessert platter at parties, picnics, or potlucks, allowing their appealing layers to catch the eye of your guests. To enhance the visual appeal, consider creating a themed platter that complements the occasion—use seasonal fruits, edible flowers, or festive decorations to create a stunning display. Providing small plates or napkins alongside will encourage guests to help themselves, making it easy for everyone to indulge in these delightful treats. You might also consider offering a variety of flavors by preparing different versions of the bars, such as adding a layer of raspberry jam or using white chocolate for a unique twist.
Gift Option
Chocolate Peanut Butter Bliss Bars also make for a thoughtful homemade gift, perfect for various occasions such as birthdays, holidays, or simply as a gesture of appreciation. To present them beautifully, wrap the bars in parchment paper, ensuring they are neatly cut and stacked. Tie them up with a decorative ribbon or twine for an elegant touch. You can also attach a personalized tag with a sweet message or the recipe, adding a personal element that shows you care. This makes them a delightful surprise for friends, family, or colleagues, and they can easily be transported to share the joy with others.
Conclusion
No matter how you choose to serve Chocolate Peanut Butter Bliss Bars, their rich flavor and appealing presentation will undoubtedly make them a highlight of any occasion. Whether enjoyed as a decadent dessert, a satisfying snack, a centerpiece at gatherings, or a heartfelt gift, these bars are sure to bring smiles and satisfaction to all who indulge in them.
Additional Tips
To ensure your Chocolate Peanut Butter Bliss Bars are a delectable success, consider the following comprehensive tips that will enhance both the preparation process and the overall flavor profile of these indulgent treats.
Room Temperature Ingredients
One of the key factors in achieving a smooth and creamy peanut butter layer is to ensure that your butter and peanut butter are at room temperature before mixing. Cold ingredients can lead to a lumpy texture that may affect the overall mouthfeel of the bars. To bring your butter and peanut butter to the right temperature, remove them from the refrigerator at least 30 minutes before you start baking. This simple step allows for easier incorporation and ensures a uniform consistency that binds well with the other ingredients.
Crust Variations
While the classic graham cracker crust is a timeless choice, experimenting with different crust variations can elevate your Chocolate Peanut Butter Bliss Bars to new heights. For a nutty twist, consider substituting a portion of the graham cracker crumbs with finely ground nuts, such as almonds, pecans, or walnuts. This not only adds a delightful crunch and unique flavor profile but also enhances the nutritional value of the bars. You could also explore using gluten-free graham crackers or oats for a gluten-free version, allowing everyone to enjoy these blissful treats.
Chocolate Options
The type of chocolate you choose can significantly impact the overall taste of your bars. While semi-sweet chocolate chips are a popular choice, don’t hesitate to experiment with dark chocolate or milk chocolate based on your personal preference. Dark chocolate will provide a rich, slightly bitter contrast to the sweetness of the peanut butter layer, while milk chocolate will create a creamier, sweeter harmony. You can also mix different types of chocolate for a more complex flavor. For those who enjoy a hint of sophistication, consider using gourmet chocolate bars that you chop into chunks instead of chips. This can add an artisanal touch to your bars.
Storage
Proper storage is crucial for maintaining the freshness and flavor of your Chocolate Peanut Butter Bliss Bars. To keep them at their best, store the bars in an airtight container in the refrigerator. They can last for up to a week, making them a convenient snack option for busy days. If you want to enjoy them beyond that timeframe, consider freezing them. Wrap each bar individually in plastic wrap or aluminum foil before placing them in a freezer-safe container or zip-top bag. When stored this way, the bars can last for up to three months. When you’re ready to enjoy them, simply thaw at room temperature or warm them slightly in the microwave for a few seconds to restore their creamy texture.
Additional Flavor Enhancements
For those looking to further enhance the taste of their bars, consider adding a pinch of sea salt on top of the chocolate layer before it sets. This will create a delightful contrast between sweet and salty, elevating the overall flavor experience. You could also incorporate ingredients such as vanilla extract into the peanut butter mixture for an additional layer of flavor. If you’re feeling adventurous, consider adding a swirl of caramel or a sprinkle of crushed pretzels for added texture and taste.
Serving Suggestions
When it comes to serving your Chocolate Peanut Butter Bliss Bars, presentation matters. Cut them into uniform squares or rectangles for a clean look, and consider dusting them with powdered sugar or cocoa powder for an elegant touch. Pair these bars with a glass of cold milk or a scoop of vanilla ice cream for a classic dessert experience that will impress your family and friends.
By following these tips, you’ll not only enhance the preparation and flavor of your Chocolate Peanut Butter Bliss Bars but also create a gratifying treat that everyone will love. Enjoy the process and the delicious results!
FAQs
1. Can I use natural peanut butter for this recipe?
Yes, you can use natural peanut butter, but ensure it’s well-stirred as natural varieties tend to separate. The consistency might be slightly different, so adjust the powdered sugar if needed.
2. What can I substitute for graham cracker crumbs?
Crushed digestive biscuits or vanilla wafers are good alternatives to graham cracker crumbs.
3. How can I make these bars gluten-free?
Use gluten-free graham crackers or cookie crumbs to make the recipe gluten-free.
4. Can I make these bars vegan?
Yes, substitute butter with vegan margarine and use dairy-free chocolate chips. Also, ensure your graham crackers are vegan.
5. Is there a way to reduce the sugar content?
You can try using a sugar substitute like stevia or erythritol, but the texture and taste might vary slightly.
Conclusion
Chocolate Peanut Butter Bliss Bars are not just a dessert; they are a celebration of flavors that combine the rich, indulgent taste of chocolate with the creamy, nutty essence of peanut butter. This delightful treat is crafted to appeal to both the sweet tooth and the health-conscious individual, making it a versatile option for various occasions. Whether you’re hosting a festive gathering, celebrating a milestone, or simply indulging in a midweek treat, these bars are sure to elevate the moment.
One of the most compelling aspects of these bliss bars is their easy preparation. With minimal ingredients and straightforward steps, even novice bakers can create a mouthwatering dessert that looks and tastes gourmet. The recipe typically requires common pantry staples such as graham cracker crumbs, butter, peanut butter, powdered sugar, and chocolate, making it accessible for those who may not have specialized baking supplies on hand. This simplicity ensures that you can whip up a batch without feeling overwhelmed, allowing you to focus on the joy of baking and the anticipation of sharing your creation.
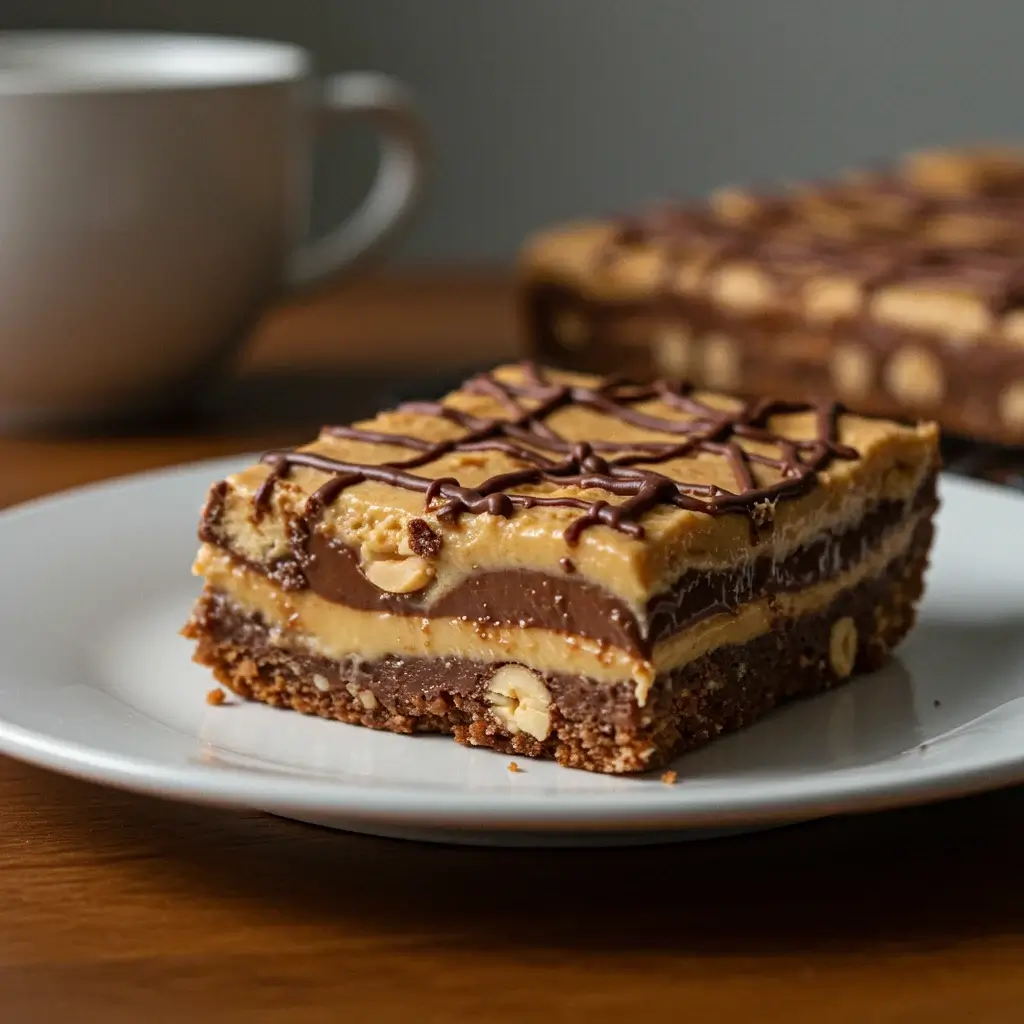
The layers of the Chocolate Peanut Butter Bliss Bars add to their allure. Starting with a crispy, buttery base, followed by a velvety peanut butter layer, and finishing with a rich chocolate topping, each bite offers a delightful contrast of textures and flavors. The crispiness of the base complements the creaminess of the peanut butter, while the chocolate layer adds a luscious finish that ties everything together. This multi-layered approach not only enhances the visual appeal of the bars but also creates a dynamic tasting experience that keeps you coming back for more.
Moreover, the versatility of this dessert cannot be overstated. You can easily customize these bars to suit your preferences or dietary needs. For instance, if you’re looking to make a gluten-free version, simply substitute graham crackers with gluten-free alternatives. You can also experiment with different types of chocolate, such as dark, milk, or even white chocolate, to create a unique twist on the traditional recipe. For those who may be avoiding sugar, options for natural sweeteners can help maintain the delicious flavor profile while accommodating various dietary restrictions.
Sharing these blissful bars with family and friends is an experience that enhances their enjoyment. The act of giving homemade treats often brings people together, fostering connections and creating memories. Whether it’s at a family gathering, a potluck, or simply a casual get-together, these bars are sure to be a conversation starter and a crowd-pleaser. Watching loved ones savor each bite can be one of the most rewarding aspects of baking, as it allows you to share not just a dessert but also a piece of your creativity and passion.
In conclusion, Chocolate Peanut Butter Bliss Bars are more than just a treat; they are an invitation to indulge in a moment of joy and satisfaction. Their delightful combination of flavors, ease of preparation, and adaptability make them a must-have in any recipe collection. So the next time you’re in the mood to create something special, consider whipping up a batch of these bliss bars. You’ll not only satisfy your sweet cravings but also create a delicious experience that brings happiness to those around you. Enjoy the rich, creamy layers with every bite, and share the bliss with family and friends, making each occasion a little sweeter.
Print
Chocolate Peanut Butter Bliss Bars
Ingredients
To create Chocolate Peanut Butter Bliss Bars, you’ll need the following ingredients:
- Crust:
- 1 and 1/2 cups of graham cracker crumbs
- 1/2 cup of unsalted butter, melted
- 1/4 cup of granulated sugar
- Peanut Butter Layer:
- 1 cup of creamy peanut butter
- 1/2 cup of unsalted butter, softened
- 1 and 1/2 cups of powdered sugar
- 1 teaspoon of vanilla extract
- Chocolate Layer:
- 1 and 1/2 cups of semi-sweet chocolate chips
- 1/4 cup of creamy peanut butter
- Optional Toppings:
- Chopped peanuts
- Sea salt
- Drizzle of melted white chocolate
Instructions
Creating these bliss bars is a straightforward process. Follow these steps to ensure your bars turn out perfect:
Step 1: Prepare the Crust
- Preheat your oven to 350°F (175°C).
- In a bowl, combine graham cracker crumbs, melted butter, and granulated sugar. Mix until the crumbs are evenly coated.
- Press the mixture firmly into the bottom of a 9×13-inch baking dish.
- Bake the crust for about 8-10 minutes until it’s lightly golden. Remove from the oven and let it cool.
Step 2: Make the Peanut Butter Layer
- In a large mixing bowl, beat the softened butter and creamy peanut butter together until smooth and creamy.
- Gradually add powdered sugar and continue mixing until fully combined.
- Stir in the vanilla extract.
- Spread the peanut butter mixture evenly over the cooled crust.
Step 3: Prepare the Chocolate Layer
- In a microwave-safe bowl, melt the chocolate chips and peanut butter together in 30-second intervals, stirring in between until smooth.
- Pour the chocolate mixture over the peanut butter layer, spreading it evenly.
Step 4: Add Toppings and Chill
- If desired, sprinkle optional toppings such as chopped peanuts, sea salt, or a drizzle of melted white chocolate over the chocolate layer.
- Refrigerate the bars for at least 2 hours or until set.
Step 5: Slice and Serve
- Once set, remove the bars from the refrigerator and let them sit at room temperature for a few minutes for easier slicing.
- Cut into squares and serve.
Nutrition
- Serving Size: one normal portion
- Calories: 250
- Sodium: 120mg
- Fat: 16g
- Carbohydrates: 23g
- Protein: 4g
- Cholesterol: 20mg


